Wanneer een Windows 200x client al een DHCP lease heeft en een herstart krijgt zal deze proberen deze lease te vernieuwen bij de DHCP server door een DHCPRequest package te versturen. Als de DHCP server antwoord met een DHCPAck package zal de client zijn lease vernieuwen. Als de DHCP server antwoord met een DHCPNack package zal de client het lease proces opnieuw uitvoeren. Mocht de DHCP server geen antwoord geven zal de client een ping uitvoeren naar de Default Gateway welke in zijn bestaande lease gedefinieerd staat. Mocht de ping succesvol zijn zal de client zijn bestaande lease behouden en proberen deze op 50 procent van de toegewezen tijd te vernieuwen. Indien het geval dat de ping mislukt zal de client een zichzelf een zgn APIPA adres toekennen en zal op de achtergrond proberen een DHCP server te vinden.
Tags
Howto
(51)
Free Software
(35)
Powershell
(33)
Windows Server
(23)
AD
(16)
Hyper-V
(16)
Exchange
(13)
Office
(13)
Group Policy
(10)
Windows Server 2012
(9)
Scripts
(7)
Symantec BE
(5)
Windows 8
(5)
Cisco
(4)
TMG
(4)
Terminal Server
(4)
Cluster
(3)
HP
(3)
RDS
(3)
UAG
(3)
Citrix
(2)
DC
(2)
DNS
(2)
IE10
(2)
OpenID
(2)
PKI
(2)
SCVMM
(2)
Windows Live
(2)
iLO
(2)
Backup
(1)
DPM
(1)
Fileserver
(1)
IE
(1)
SQL; DPM
(1)
Security
(1)
Sharepoint
(1)
Switch
(1)
VMWare
(1)
Veeam
(1)
dinsdag 31 juli 2012
Verwijderde items herstellen in Outlook
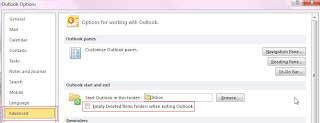
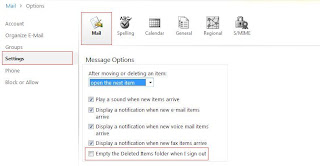
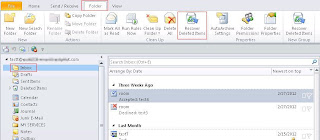
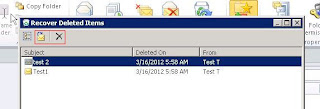
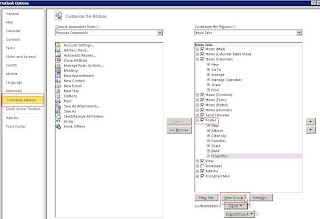
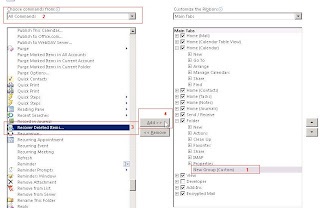
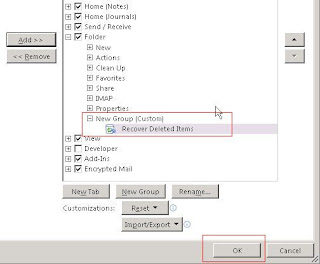
Afhankelijk van de Exchange server instellingen kun je items die je in Outlook hebt verwijderd toch terughalen:
maandag 30 juli 2012
Flash updates uitschakelen
Administrator configuration of auto-update notification and background update process
Administrators can configure auto-update notification settings by deploying a file named mms.cfg. The mms.cfg file is intended for configuration by an IT administrator and is stored on the user's computer. Flash Player installation does not create the file. You can use third-party administration tools, such as Microsoft System Management Server, to replicate the configuration file to the user's desktop.
The mms.cfg file is a UTF-8 text file. The format of the mms.cfg file is a series of name=value pairs separated by carriage returns. If a parameter is not set in the file, Flash Player assumes the default value. When set, values in this file override the user-configured settings stored in a per-user local shared object.
Note: Settings in mms.cfg override the users settings and users cannot change it through Settings Manager. Settings Manager, as viewed by the user, doesn't reflect configuration settings set by mms.cfg.
If you are deploying Flash Player 8 or later, store the mms.cfg file in the following location depending on the operating system:
· Windows NT, 2000-- C:\WINNT\System32\Macromed\Flash
· Windows XP, Vista --C:\WINDOWS\System32\Macromed\Flash
· Windows 95, 98, or ME--C:\Windows\System\Macromed\Flash
· Windows 64 bit -- C:\Windows\SysWOW64
· Macintosh--\Application Support\Macromedia
For player versions earlier than Flash Player 8, store the mms.cfg file in the following location depending on the operating system:
· Windows NT, 2000--C:\WINNT\System32
· Windows XP, Vista-- C:\WINDOWS\System32
· Windows 95, 98, or ME--C:\Windows\System
· Windows 64 bit -- C:\Windows\SysWOW64
· Macintosh-- \Application Support\Macromedia
Note: Flash Player 8 and later versions can read mms.cfg from either the new or old location. If mms.cfg exists in both locations, Flash Player 8 reads settings from the new location.
The following table describes settings in the mms.cfg file:
Default
|
Description
| |
AutoUpdateDisable
|
0
|
0 allows auto-update based on user settings.
1 disables auto-update. |
AutoUpdateInterval
|
<0 (or absent)
|
Takes a numeric value.
<0 (or absent) uses value from player settings.
0 checks for updates every time the player launches. >0 specifies the minimum number of days between check for updates. |
SilentAutoUpdateEnable
|
1
|
0 allows background update.
1 disables background update. |
Disable auto-update notification
2. Add the following auto-update setting:
AutoUpdateDisable=1
AutoUpdateDisable=1
3. Save the mms.cfg file with UTF-8 encoding in the correct system location for the user's operating system.
4. Close and restart Flash Player or the browser in which Flash Player is running for the new setting to take effect.
1. Create or open the mms.cfg file in a text editor.
2. Add the following auto-update setting:
AutoUpdateDisable=0
SilentAutoUpdateEnable=1
AutoUpdateDisable=0
SilentAutoUpdateEnable=1
3. Save the mms.cfg file with UTF-8 encoding in the correct system location for the user's operating system.
4. Close and restart Flash Player or the browser in which Flash Player is running for the new setting to take effect.
Administrators can verify the mms.cfg configuration has disabled auto-update by using a packet sniffer with the following test:
1. In mms.cfg, set AutoUpdateDisable=0 to allow auto-update. Verify that auto-update is enabled in Settings Manager.
2. Add the auto-update setting:
AutoUpdateInterval=0
With this setting, Flash Player requests the version file every time it starts and the request appears in the network request traffic.
AutoUpdateInterval=0
With this setting, Flash Player requests the version file every time it starts and the request appears in the network request traffic.
3. Open a web page with Flash content to start Flash Player. A simple page with a single piece of Flash content is best, to minimize the network traffic in the packet sniffer log. The packet sniffer shows the auto-update request traffic to http://fpdownload.macromedia.com/
Note: Avoid using www.macromedia.com as your test page, since the auto-update request is lost in the other file requests.
Note: Avoid using www.macromedia.com as your test page, since the auto-update request is lost in the other file requests.
4. Set the AutoUpdateDisable to 1 to disable auto-update notification.
5. Open a web page with Flash content to start Flash Player. There is no version file request traffic.
Link:
http://helpx.adobe.com/flash-player/kb/administration-configure-auto-update-notification.html
Link:
http://helpx.adobe.com/flash-player/kb/administration-configure-auto-update-notification.html
maandag 2 juli 2012
Alternate Data Streams
Hieronder een uitleg over ADS. Deze heb ik in de tijd gemaakt toen Windows XP net uit was, echter is het verhaal nog steeds van toepassing (Windows 7).
Wat zijn verborgen Alternate Data Streams?
NTFS, (Windows NT, 2000, XP) heeft een toepassing die niet goed gedocumenteerd is en waar maar weinig systeembeheerders vanaf weten. Deze toepassing heet “Alternate Data Streams” (ADS) en het staat toe dat er verborgen bestanden gekoppeld kunnen worden aan een normaal zichtbaar bestand.
Waarom ondersteunt NTFS ADS?
De belangrijkste reden is voor het ondersteunen van Macintosh bestanden. Bestanden opgeslagen op het Macintosh Hierarchical File System (HFS) bestaan uit twee stukken (forks), een data fork en een resource fork. Windows maakt gebruik van de extensie van een bestand (eg. “.exe”) om duidelijk te maken welk programma met dat bestand geassocieerd moet worden. Macintosh bestanden maken gebruik van de resource fork. NT slaat de Macintosh resource forks op in een ADS. Sommige Anti-Virus programma’s slaan per bestand checksums op in een ADS.
Wat zijn de belangrijkste gevaren van ADS?
- ADS zijn alléén zichtbaar met speciale software (Microsoft heeft zelf helemaal niets om ADS zichtbaar te maken / Update: vanaf Windows 7 heb je de optie dir /r).
- Bekendheid van ADS is extreem laag.
- ADS kunnen niet alleen aan bestanden attachen, maar ook aan directories.
- ADS kun je zelf niet verwijderen, je kunt ze alleen verwijderen door het parent bestand te verwijderen. Echter,
- ADS die attached zitten aan de root van een drive, zoals “C::myADS”, kunnen niet verwijderd worden.
- “Beschikbare Disk Ruimte” zoals programma’s als “Windows Verkenner” die laten zien, nemen de ruimte die door ADS worden geconsumeerd niet in zich op.
- ADS, wat gewoon bestanden zijn, kunnen nog steeds worden uitgevoerd. Het is dus mogelijk om een “.exe” bestand als ADS aan een ander bestand te koppelen en vervolgens uit te voeren. (In Windows 7 zit een beveiliging die dit blokkeerd, echter kun je deze beveiliging omzeilen door een Symbolic Link (mklink.exe) naar de ADS te maken en deze uit te voeren)
- Een uitgevoerde ADS geeft zijn bestandsnaam in de Taskmanager niet juist weer. Als bijvoorbeeld de ADS “c:\test.txt:myADS” is uitgevoerd, dan zou Taskmanager alleen “test.txt” weergeven.
Hoe kun je ADS toch detecteren?
Er zijn op dit moment een aantal thirdparty programma’s, waaronder enkele freeware programma’s, die het mogelijk maken om ADS te detecteren.
Voorbeelden zijn:
- TDS-3 van DiamondCS
- LADS van Frank Heyne
- Hunt van Foundstone
- Dir /r (onder Windows 7)
Hoe maak je een ADS?
De syntax voor het maken van een ADS is simpel. Je hebt een zgn. parent bestand waaraan een of meerdere ADS gekoppeld zitten, door het plaatsen van een dubbele punt “:”, tussen het parent bestand en de ADS, verwijs je naar de ADS.
C:\ads>echo Dit is een ADS > myfile.txt:myADS
Tevens kun je een ADS aanmaken met de inhoud van een ander bestand.
C:\ads>echo Dit is een test bestand > test.txt
C:\ads>type test.txt > myfile.txt:myADS
Je kunt de ADS testen m.b.v. Notepad.
C:\ads>notepad myfile.txt:myADS
De inhoud van een ADS hoeft niet persé tekst te bevatten, de inhoud kan elke binary informatie bevatten, dus ook executables.
C:\ads>type c:\winnt\notepad.exe > myfile.txt:np.exe
Hiermee hebben we notepad als ADS aan myfile.txt gekoppeld met de naam np.exe.
Op deze manier kun je dus ook: plaatjes, audio bestanden, etc. als ADS aan een bestand kunnen koppelen.
Hoe voer je een ADS uit?
We hebben hiervoor al gezien hoe we een ADS kunnen openen in Notepad, maar je kunt ADS, als het executables zijn, ook uitvoeren.
C:\ads>start myfile.txt:np.exe
Echter blijkt dat bovenstaande opdracht fouten genereert onder Windows 2000, door de opdracht uit te voeren met een absoluut of relatief path vermijd je dat probleem.
C:\ads>start c:\ads\myfile.txt:np.exe
C:\ads>start .\ads\myfile.txt:np.exe
Hoe verwijder je ADS?
Er zijn een aantal mogelijkheden:
- Je verwijdert het parent bestand, hiermee verwijder je alle ADS die eraan gekoppeld zitten.
- Je voert de volgende handelingen uit:
C:\ads>type myfile.txt > myfile.bat
C:\ads>del myfile.txt
C:\ads>ren myfile.bat myfile.txt
- Je kunt het bestand verplaatsen naar een FAT partitie, aangezien FAT niet ADS ondersteunt worden de ADS ook niet meegenomen.
Opmerking: als je een parent bestand met daaraan gekoppeld, een of meerdere ADS, naar een andere NTFS partitie (of zelfs drive mapping) kopieert of verplaatst, zullen deze ADS meegenomen worden.
Er zijn tegenwoordig hier ook filmpjes over te vinden, even snel Googlen geeft bijvoorbeeld:
Abonneren op:
Posts (Atom)
